Monday, March 17, 2014

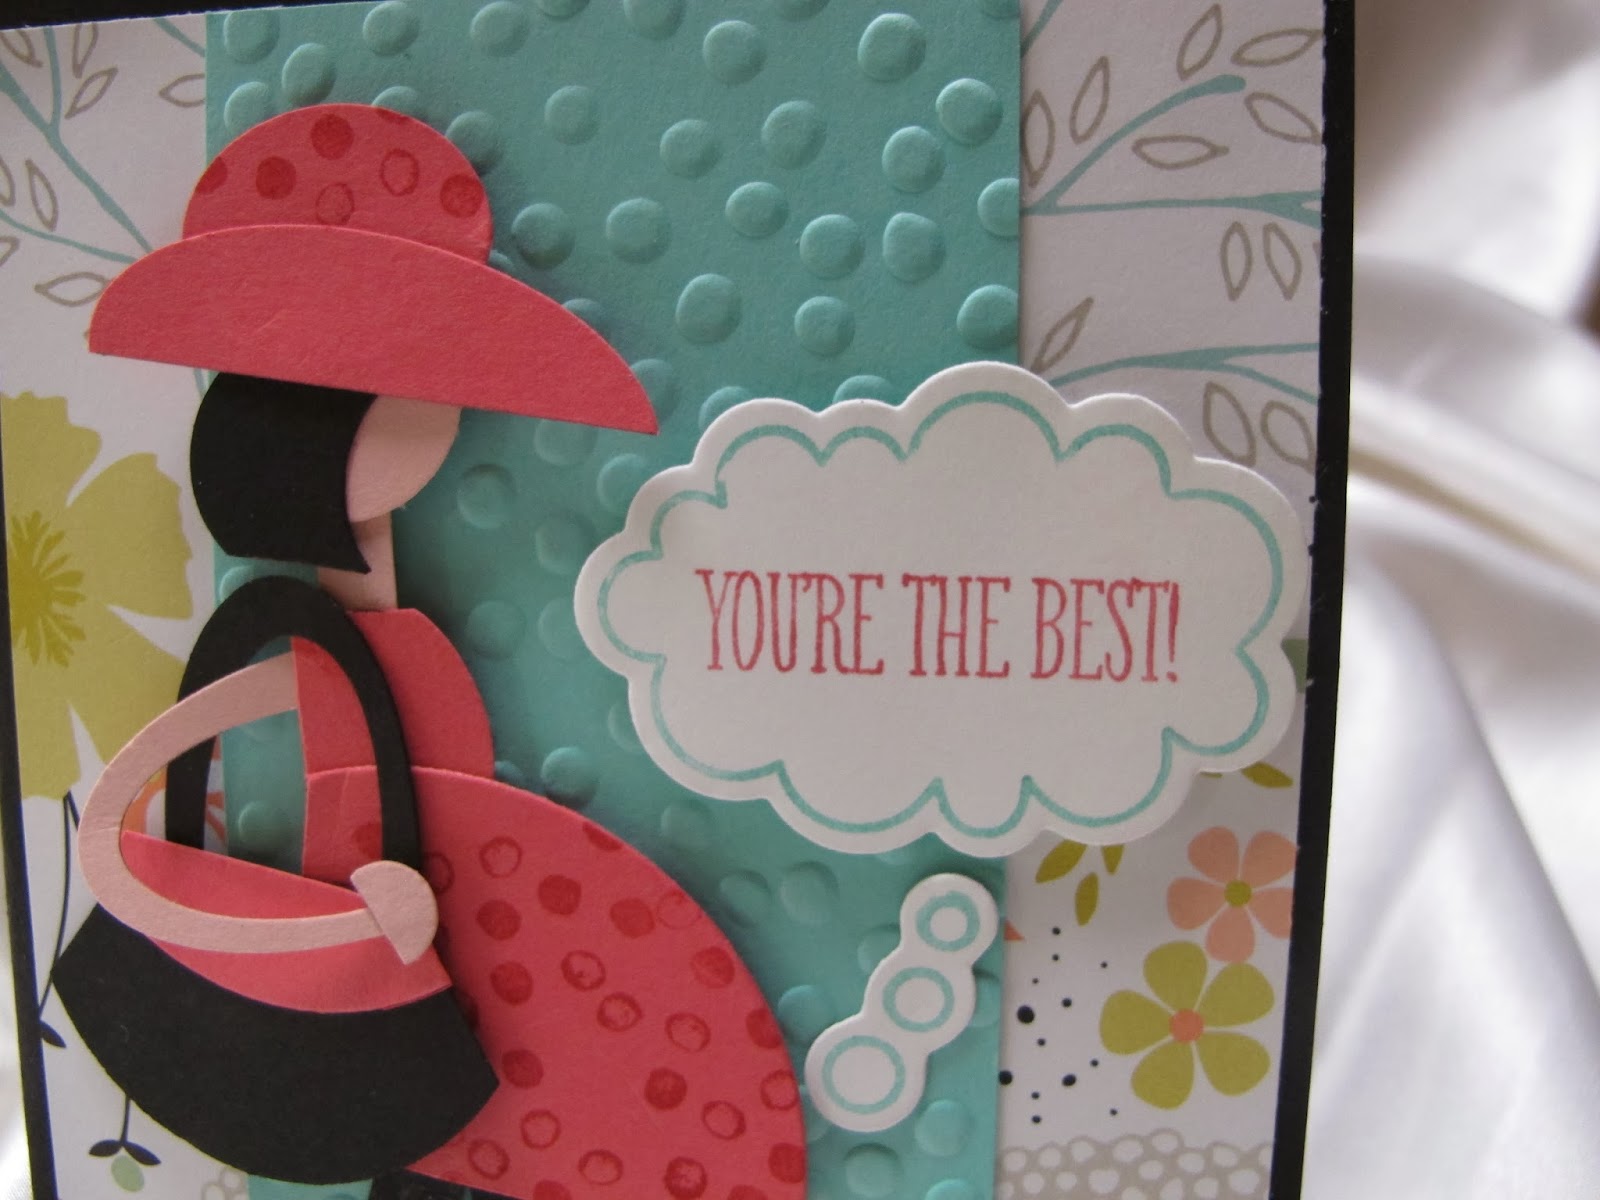
Mama to be step by step

Hope you enjoy making this PUNCH ART card - Thank you to all the girls that have order this kit
so lets get started. If you have a kit you can see I have punch out the shapes but you need to trim them into shape.


So here are all the shape you need to cut


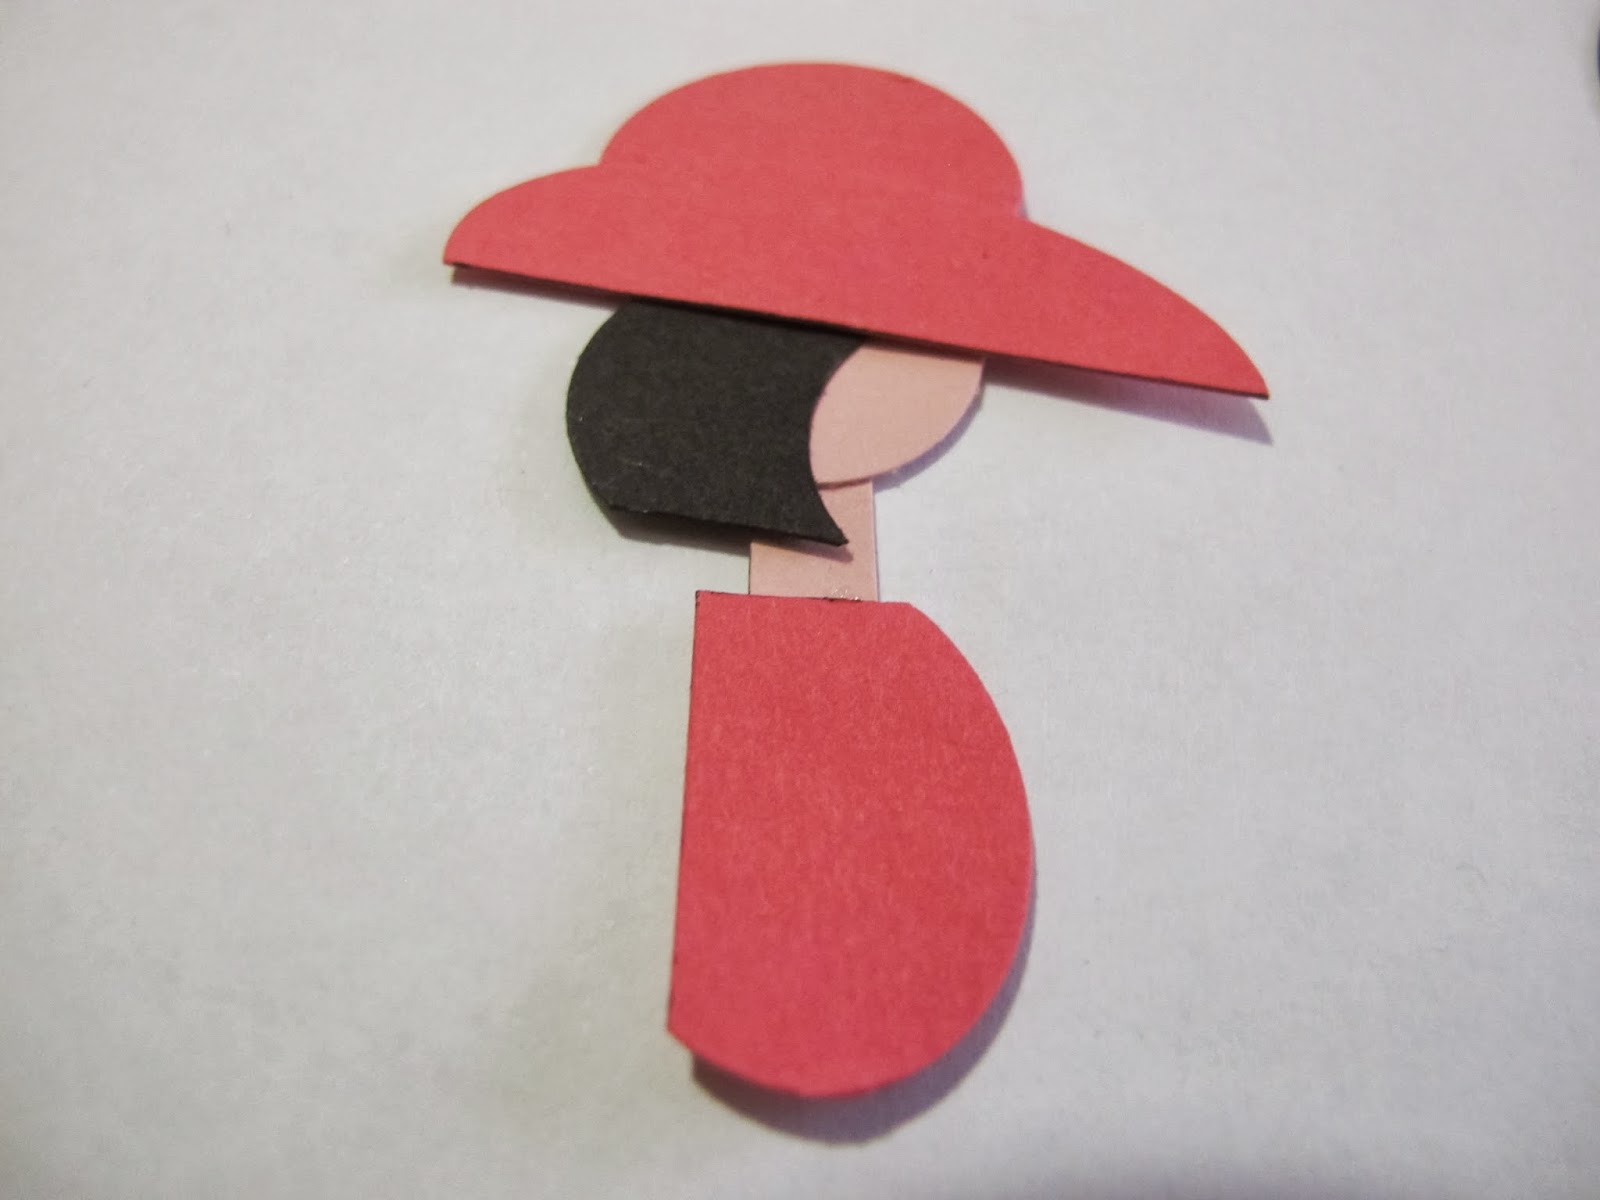
To start you need to trim your Strawberry Slush 1-3/4 x 7/8
Large  oval shape. Then snail to the small oval 3/4x15/16 punch shape

Using the 3/4' circle punch shape in Basic black and trim as in
photo above to make hair. Use the Blushing Bride  3/4 circle punch
 shape for the face. Snail hair to face

Snail hat to the head

Add your neck  which is the small Ticket Duo Builder in
Blushing Bride card. Using the small Oval punch cut as in
photo above then snail to neck.

To get our belly use the Big shot Circles Collection Framelits
6cm across and cut as in photo above then snail to top of Dress

using basic Black card and  the Modern Label trim up both sides to
 make pants then snail to the back of dress.
You will also have a 7cm x 14 cm Coastal Cabana Card and I have used the
Decorative Dots Embossing Folder this is done if you have a kit but if not you can
use any embossing folder you have.
 

you will have two 1 3/4" Circle one in Basic Black cut to shape
and one in Strawberry Slush cut to shape to make top of bag.
Using the Large oval Punch trim to make handle  

If you like to stamp on dress and hat I have used the dots out of
the Happy Watercolor Stamp set out of the Occasion Catalogue


Using the large oval in Blushing Bride card and cut to shape
for the arm and snail at back of dress . Then add your bag
as in the photo above

Add a Stampin Dimensionals on dress to hold bag down as in
photo above

Shoes I have used the Secret Garden Framelits shape the shoes

You will need to cut your two shoes as above draw the shape
you wont then cut. Add shoe to ankles with is the other Ticket Duo
cut in half and snail to pants and shoes see the forth photo down


Cut you Basic Black card 14.5cm x 21cm fold in half
 using a Bone folder
 Then add Sweet Sorbet Designer Series Paper from SAB

If you don't have this you still have time to purchase
a $90 order or a $180 and you can get both the Sweet Sorbet DSP
and the Decorative Dots you have until 31 March 2014

 
I also have used the Just Sayin' Stamp set and the Word
Bubbles Framelits Die from the Occasion Catalogue
Also used our ink markers Strawberry Sluch and Coastal Cabana
Then use the Big shot and the Magnetic platform to hold
the framelits in place as in the photo  above,

Stamp out and run through big shot

This is the back side of our lady. know add Dimensionals to the back
so she will stand out from the card.
 

Turn over make sure you can not see and Dimensionals

Snail your DSP to your card then add the embossed Coastal Cabana
strip then add your lady and your words


Bit more of a close up for you
 I really hope you enjoy making Mama to be


So what I used to make this card
Stamp set:- Happy Watercolor Shop Here wood or Here Clear
Just Sayin Shop Here Wood or  Here Clear

Card Stock: Strawberry Slush
            Basic Black
                 Coastal Cabana
               Whisper white
 
DSP: Sweet Sorbet Free SAB with each $90 Purchase!
 
Inks: Markers
Strawberry Slush
Coastal Cabana
 
Punch:-
Large Oval
Small Oval
Modern Label
Ticket Duo Builder
Owl Builder
1-3/4 Circle
3/4 circle
 
Big Shot:
Circles Collection Framelits
Secret Garden Framelits
Word Bubbles Framelits
 
Embossing Folder:
Decorative Dots SAB Free with each $90 Purchase! AU only


SAB ends 31 March 2014

Monday, March 10, 2014

Sweet Sorbet SAB

Sale- A-Bration
I have just been having a lot a fun using all my Free product
 
 
I have used in this card
1. Sweet Sorbet SAB
2. Decorative Dots Embossing Folder SAB
3. See Ya Later Stamp Set SAB
4. Banner Blast Stamp set SAB
5.Banner Punch SAB

I used Basic Black Ink 126980 $9.95
Illuminate Glimmer Watermark Stampin' Pad 126857 $18.95

Basic Black Card Stock 121688 $11.95
Coastal Cabana 131302 $11.95
Snail Adhesive 104332 $11.95
Stampin' Dimensionals 104430 $6.95


enjoy Happy Stamping Teresa


Sunday, March 9, 2014

Sale A Bration Banner Blast Stamp Set

 
Sale - A -Bration
Only 20 more days left
Book your very own workshop so you can get free products before
 Sale - A - Bration ends on March 31st .Contact me 0409533925
I am happy to also send or drop off free catalogues
If you like to know more about Stampin' Up!
Head Across to my Stampin' Up! Site LOOK HERE
If you don't have time to attend a class or book a workshop
You don't have to miss out Head Across to my Stampin' Up Site
and shop on line.
FREE Product with each $90 Purchase! (AU Only)


Banner Blast Card
In this card I have used Four Free Sale A Bration Product
Banner Blast
Banner Punch
See Ya Later Stamp Set
Sweet Sorbet Accessory Pack
Card & Ink
Crisp Cantaloupe, Basic Black, Whisper White

Friday, March 7, 2014

Hardwood And Lovely as a Tree Stamp sets

Autumn Four Season
This was meant to be added to my four Season and I have run out of time, so I have added it here on my blog for you I really think Trees and Autumn go hand in hand and you could use any colour when making this card.

This Hardwood Stamp set and one of my favourites Lovely as a Tree.


1 Place the size Circle you like to use to stamp on then run it
through the big shot

2 Ink Up your Hardwood Stamp with the Ink colour you like
 I have used Early Espresso. Then place your whisper white card
over the big back ground stamp
 

It will look like this

Stamp out the Lovely as a tree stamp onto your circle and
sponge  using craft whisper white and keep adding until
you get the look you wont then add to the outside top and bottom
basic grey or Smokey slat  to get the look you want. Draw in a fence
using basic grey marker and highlight across top and down right side
of the fence poles using the White Stampin Chalk Marker
Stamp out a word I used the thinking of you from the Peaceful Petals
stamp set.

Then add some sponging over the Hardwood back ground stamp
I used as small amount of basic grey and Crumb cake and
Early Espresso inks

Snail all elements  to card  and add some Trim to give it that earthy feel.

enjoy  my Four Season Link at top of page
thanks for stopping buy Happy Stamping
Teresa
 

Thursday, March 6, 2014

Stampin' Up! Wheel to Stamps

Wheel to Stamps.
Hi today I have a great little tip for you, how many of you have Stampin' Up! Wheel and sadly don't use. I like to share this with you...

Clear Mount Cling Foam shop here 124436 $18.95

Sorry forgot to take photo of  me cutting the Gingham Wheel.
1st find the seam and use a craft knife to cut and very carefully
 lift then very gently peal of the wheel. 

2 know you have a long stamp
and a empty wheel as above not sure what I am going to use  this
 empty wheel for but will share with you when I do.
 

3 Make sure that you find sticky side of the Clear Mount Cling Form
Place the Stamp over it and press down.


4 Use some craft Scissors and cut along the rubber of the stamp


5 Turn over and peel of the backing paper.

6 I used H Block & D Block as in photo above.

Know lets make a quick card

7 Add some ink I have used Early Espresso126974 $9.95 and Whisper
White Card Stock 106549 $14.95

8 I then stamp out something just for you in Early Espresso
and one in Crushed Curry Ink 131173 $9.95
I used Label Something Stamp set Clear 130598 $24.95

9 I also like the idea to add some butterflies I used
Papillon Potpourri Clear Stamp Set 123759 $25.95

10. Use Bitty Butterfly punch 129406 $27.95 and Elegant
Butterfly 127526 $27.95 Punch around 3 big stamp in
Crushed Curry and Small Early Espresso for 3 small butterflies

11 Snail whisper white card 14.5 x 10cm to
Early Espresso Card 15cm x 10.5cm
use a Stampin Dimensionals 104430 $6.95 to the
back of your Hexagon words.  I have use the Hexagon
Punch 130919 $27.95
 

12 With the Early Espresso I used my Stampin' up! Paper
Snips 103579 $16.95 to cut around the words as above
use a dimensional behind to raise up

Don't you just love Candy Dots Neutrals 130934 $9.95

13 As you can see I have added 3 Early Espresso to top and bottom
of my card and one Crumb Cake at the top of each Butterflies
also added the small butterfly on top of the big one with a dimensional.

enjoy using your wheels to stamps and have fun.

Shop today with me and have fun

Wednesday, March 5, 2014

Modern Medley Class

Our Next Thursday Class  


Modern Medley Class 20th March 2014
Time 10am-12 noon & 1pm-3pm Must book your seat
Need to order DSP Modern Medley 126926 $18.95 + postage
 to shop click here for Modern Medley DSP
More info when you book in have a great day enjoy Happy Stamping Teresa


New Catalogue Launch Party

WOW its New Catalogue Launch Party...

Our New Occasion  & Sale-A-Bration Catalogues !! ARE HERE!!

This is a very exciting time of the year. Its time where YOU can get FREE Products
 from 28 Jan -31st March So don't miss booking in.

For every $90 you spend you will receive your choice of Free items from the SAB Catalogue.


My Launch is going to run over two days and you will need to book in.
This is open to anyone that would like to attend will fill fast so book your seat today!!!

Dates: Friday 14th March  & Saturday 15th March 2014
Times: Morning  10am -12 noon Afternoon 1pm - 3pm  Night 7pm- 9pm same time for both days
Place: My Place will give address when you book in. Call - 0409 533 925
Cost:  Kit $20 (cupper & light snack)
Don't Forget to ask me about my Gift Certificate it has lots on it you could receive half price Kit or even a Free one more info on Gift Certificate will be sent to you when you book.
Some of you may already have one that I have sent you so book in and bring with you

I am so excited to share a sneak Peek of the project we will be making at this years
Catalogue Launch Party Love to see YOU there!!!


This is a beautiful card and box envelope to match come along and join into 2 hr. of fun
 using new products & learning great technique.

Some of the products you will be using:-
Spiral Flower Originals Die
Banners Framelits
Perfect Pennants Stamp Set
Peaceful Petals Stamp set
and so much more
Fringe Scissors
Envelope Punch Board

Happy Stamping Teresa